Battery switch on travel trailer function is crucial for managing your RV’s power. Understanding how these switches work—whether single, dual, or selector—is key to preventing battery drain and ensuring a smooth camping experience. This guide breaks down everything you need to know, from location and operation to troubleshooting and maintenance.
We’ll explore the different types of battery switches, their placement in various travel trailer models, and the safe procedures for connecting and disconnecting batteries. We’ll also cover common problems, preventative maintenance, and the vital role the switch plays in conserving battery life. Get ready to become a battery switch expert!
Battery Switch Types in Travel Trailers
Choosing the right battery switch for your travel trailer is crucial for managing your power sources efficiently and safely. Different types offer varying levels of control and complexity, each with its own set of advantages and disadvantages. Understanding these differences will help you select the best option for your needs.
Single Battery Switch Functionality
A single battery switch is the simplest type. It’s essentially an on/off switch for your trailer’s battery. When the switch is on, the battery is connected to the trailer’s electrical system, powering lights, appliances, and other devices. When it’s off, the battery is disconnected, preventing drain. This type is best suited for trailers with a single battery and minimal power needs.
Advantages and Disadvantages of Single Battery Switches
Single battery switches are inexpensive and easy to install. Their simplicity makes them user-friendly, requiring minimal understanding of electrical systems. However, they lack the flexibility of more advanced switches. They offer no way to isolate or manage multiple batteries. If you have a second battery for auxiliary power (like a deep cycle battery for a separate system), you’ll need a more sophisticated solution.
Dual Battery Switch Functionality
Dual battery switches allow you to manage two batteries independently. They typically have three positions: “Both,” “Battery 1,” and “Battery 2,” or similar options. “Both” connects both batteries to the trailer’s electrical system, providing maximum power. “Battery 1” and “Battery 2” allow you to select and use only one battery at a time, useful for conserving power or isolating a potentially faulty battery.
Advantages and Disadvantages of Dual Battery Switches
Dual battery switches offer greater control and flexibility compared to single switches. They’re ideal for trailers with two batteries, allowing for separate charging and usage of each. However, they are slightly more complex to install and understand than single switches, and slightly more expensive.
Selector Switch Functionality
Selector switches offer even more control, particularly useful in more complex setups. These switches can often handle more than two batteries, sometimes including connections to shore power or an alternator. They allow you to select which battery or combination of batteries powers the trailer’s system, and often allow for charging management of individual batteries. Some advanced versions even include monitoring capabilities.
Advantages and Disadvantages of Selector Switches
Selector switches provide the most control and flexibility, allowing for complex battery management strategies. They are suitable for trailers with multiple batteries and sophisticated electrical systems. However, they are the most expensive and complex to install and require a higher level of electrical knowledge to operate correctly.
Comparison of Battery Switch Types, Battery switch on travel trailer function
| Feature | Single Battery Switch | Dual Battery Switch | Selector Switch |
|---|---|---|---|
| Number of Batteries | 1 | 2 | 2+ |
| Control | On/Off | Both/Battery 1/Battery 2 | Multiple selections, often including shore power |
| Cost | Low | Medium | High |
| Complexity | Low | Medium | High |
Connecting and Disconnecting Batteries Using the Switch
Properly connecting and disconnecting your travel trailer’s batteries is crucial for safety and to prevent damage to your electrical system. This process involves using your battery switch, a simple but vital component. Understanding how to use it correctly will ensure your peace of mind and the longevity of your RV’s electrical system.
Safe Battery Connection and Disconnection Procedure
Before you begin any work with your batteries, remember safety is paramount. Always prioritize preventing accidental shorts and protecting yourself from potential hazards.
So, you’re an audiophile who travels? Awesome! Check out this guide on audiophile travel setups for tips on packing your gear. It’s all about finding that sweet spot between portability and sound quality. Then, once you’ve got your travel kit sorted, head over to audiophile travel setups for some inspiration on what amazing sounds you can experience on the road.
You’ll be amazed at how good your music can sound, even away from home!
- Turn Off All Appliances: Before touching anything related to the battery system, ensure all appliances and lights within your travel trailer are switched off. This prevents accidental shorts or power surges.
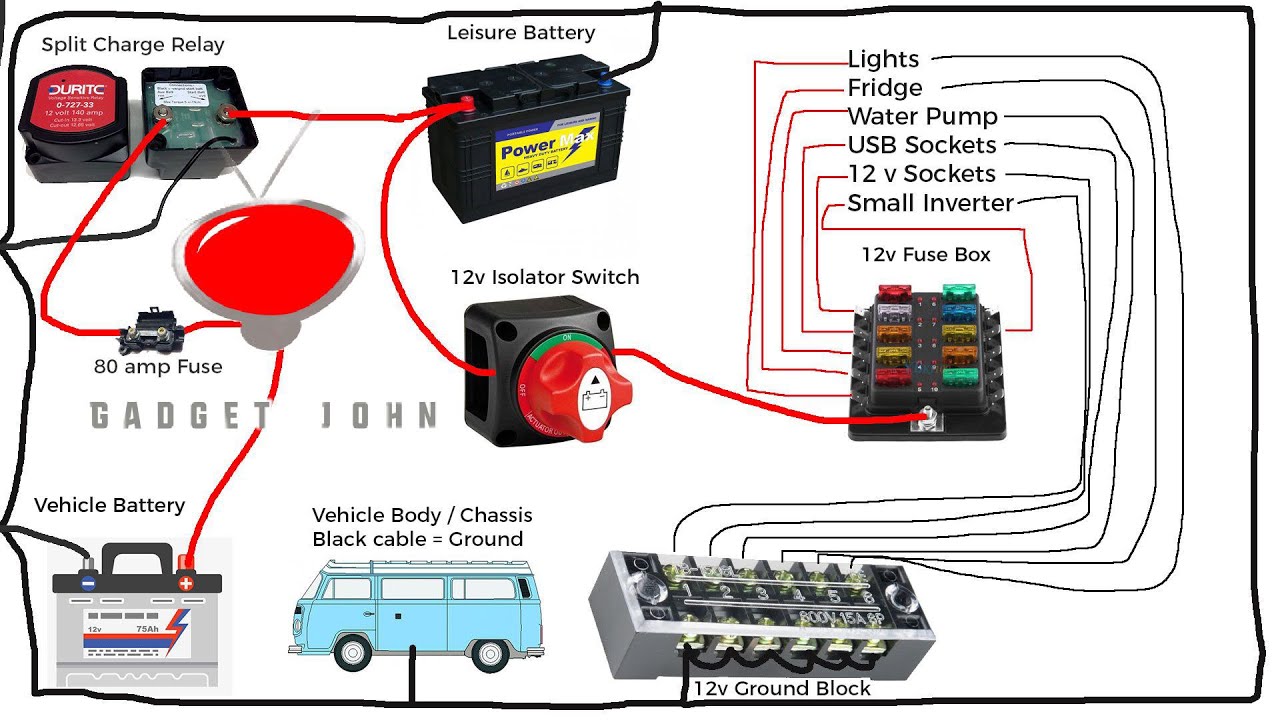
- Locate the Battery Switch: Your battery switch is usually located near your batteries, often inside a compartment accessible from the outside of your trailer. It’s typically a rotary switch with clearly marked positions (e.g., “On,” “Off,” “Both”).
- Wear Protective Gear: Always wear safety glasses to protect your eyes from potential sparks or battery acid splashes. Gloves are also recommended to prevent skin irritation from battery acid.
- Connecting the Batteries: To connect your batteries, slowly rotate the switch to the “On” or “Both” position, depending on whether you’re using one or two batteries. Observe the switch carefully; you should hear a distinct click when it engages.
- Disconnecting the Batteries: To disconnect, slowly rotate the switch to the “Off” position. Again, you should hear a click indicating the switch has disengaged. This will completely isolate the batteries from the trailer’s electrical system.
- Check for Proper Connection: After connecting or disconnecting, use a voltmeter to verify the status of the battery connection. If the batteries are connected, you should read the battery voltage across the terminals. If disconnected, you should read zero volts.
Safety Precautions During Battery Switch Operation
Working with batteries can be hazardous if not handled correctly. Always be mindful of the following:
- Avoid Sparks: Never use tools or equipment that could create sparks near the batteries. Sparks can ignite flammable battery gases, leading to an explosion.
- Proper Ventilation: Ensure adequate ventilation around the batteries. Battery gases are flammable and can build up in enclosed spaces.
- Acid Handling: If you need to handle the batteries directly (e.g., for cleaning or maintenance), always wear appropriate protective gear and take precautions to avoid spills. Battery acid is corrosive and can cause severe burns.
- No Smoking: Never smoke near batteries, as the gases are highly flammable.
Maintaining the Battery Switch
Keeping your travel trailer’s battery switch in top condition is crucial for reliable power and to prevent costly repairs down the line. Regular maintenance ensures your batteries stay charged and ready when you need them, preventing frustrating breakdowns on the road. Neglecting maintenance can lead to corrosion, poor connections, and ultimately, switch failure.Regular inspection and cleaning are key to extending the life of your battery switch.
This involves visually checking for corrosion, loose connections, and any signs of damage, and then cleaning the switch contacts to ensure optimal electrical conductivity. The frequency of these checks will depend on your climate and usage; however, a good rule of thumb is to perform a thorough inspection at least twice a year, before and after the main camping season.
So, you’re an audiophile who travels? Awesome! Check out this guide on creating the perfect audiophile travel setup for pristine sound on the go. It’s all about finding the right balance of portability and quality. Then, once you’ve got your portable setup dialed in, consider expanding your knowledge with another great resource: audiophile travel setup tips for different environments.
This will help you master sound quality no matter where your adventures take you!
Maintenance Schedule and Procedures
A simple maintenance schedule will help you keep your battery switch running smoothly. Ideally, inspect the switch every six months, or more frequently if you notice any issues. This inspection should include a visual check for corrosion on the terminals and the switch itself, as well as checking for any signs of overheating or damage. Cleaning should be done at the same time.
In harsh environments, like coastal areas with high humidity and salt air, more frequent inspections may be necessary.
Preventing Corrosion and Ensuring Long-Term Functionality
Corrosion is the biggest enemy of your battery switch. It reduces conductivity, leading to poor battery performance and potential overheating. To combat corrosion, apply a thin layer of dielectric grease to the battery terminals and switch contacts after cleaning. This grease prevents moisture from reaching the metal, thus inhibiting corrosion. Keeping the battery box clean and dry also helps prevent corrosion.
Ensure good ventilation around the battery box to allow for airflow and reduce moisture build-up.
Tools and Materials for Routine Maintenance
You’ll need only a few simple tools and materials for routine battery switch maintenance. These include a wire brush (preferably a brass one to avoid scratching the metal), a rag or paper towels, a small container for cleaning solution, dielectric grease, and optionally, a spray-on contact cleaner. Safety glasses and gloves are also recommended to protect yourself from potential splashes or contact with corrosive materials.
Cleaning and Lubricating the Switch
First, disconnect the negative battery cable from the battery. This is a crucial safety precaution to prevent accidental short circuits. Next, use the wire brush to carefully clean the terminals and the switch contacts. Remove any corrosion, dirt, or debris. You can use a contact cleaner spray to aid in this process; if using, follow the manufacturer’s instructions carefully.
After cleaning, wipe the area with a clean rag to remove any loose particles. Apply a thin layer of dielectric grease to all cleaned contacts and terminals, ensuring good coverage. Reconnect the negative battery cable. Finally, test the switch to ensure it operates correctly. If there is any difficulty with the switch’s operation after cleaning and lubricating, consult a qualified technician.
Battery Switch and its Role in Preventing Battery Drain: Battery Switch On Travel Trailer Function

Your travel trailer’s battery switch is a crucial component for protecting your batteries and preventing unexpected dead batteries. It acts as a gatekeeper, controlling the flow of power to your house batteries, allowing you to completely disconnect them from the rest of the trailer’s electrical system. This is especially important given the many potential sources of parasitic drain in a modern RV.Parasitic drain refers to the slow, continuous discharge of your batteries even when your trailer isn’t actively using power.
Things like clocks, carbon monoxide detectors, and even some poorly-designed electronics can draw a small amount of power constantly, eventually draining your batteries completely. This is where the battery switch becomes your best friend.
The Importance of Turning Off the Switch When the Trailer is Not in Use
Turning off the battery switch when your travel trailer is stored or not in use is paramount for preserving battery life. With the switch in the “off” position, it physically disconnects the house batteries from all circuits, effectively eliminating any parasitic drain. This prevents the slow, insidious depletion that can leave you with dead batteries when you’re ready to hit the road.
Leaving the switch on, even for a short period, can significantly reduce the lifespan of your batteries.
The Impact of Leaving the Switch On Versus Off on Battery Life
Leaving your battery switch on while your trailer is unused leads to a steady drain on your house batteries. The cumulative effect of this constant, albeit small, discharge can drastically shorten their lifespan. You might find yourself needing to replace your batteries far more frequently than necessary. Conversely, consistently turning off the switch when the trailer isn’t in use significantly extends the life of your batteries, saving you money and hassle in the long run.
Imagine leaving your car lights on overnight; the effect on your trailer’s batteries is similar, albeit slower.
Visual Representation of Battery Switch Isolation
Imagine a simple diagram. You have two battery banks represented by two boxes labeled “House Batteries” and “Chassis Battery”. A line connects them, representing the electrical connection. The battery switch is depicted as a valve on that connecting line. When the switch is “ON,” the valve is open, allowing current to flow between the two battery banks.
When the switch is “OFF,” the valve is closed, completely isolating the house batteries from the chassis battery and any circuits connected to them. This prevents any drain from those circuits on your house batteries.
Mastering your travel trailer’s battery switch is a simple yet powerful way to extend the life of your batteries and avoid frustrating power issues. By understanding the different switch types, practicing safe connection and disconnection procedures, and performing regular maintenance, you’ll ensure a reliable power supply for all your adventures. Remember, a little preventative care goes a long way in keeping your RV running smoothly.
Answers to Common Questions
What happens if my battery switch is corroded?
Corrosion can impede the switch’s ability to make a good connection, leading to poor power transfer or complete failure. Clean the terminals thoroughly with a wire brush and baking soda solution.
How often should I inspect my battery switch?
Inspect your battery switch at least once a season, or more frequently if you use your trailer often in wet or humid conditions.
Can I use WD-40 on my battery switch?
No, WD-40 is not suitable for battery terminals or switches. Use a dielectric grease designed for electrical connections.
My battery switch is stuck. What should I do?
Try lubricating the switch mechanism with a small amount of penetrating oil. If it’s still stuck, it might require replacement.
